Managing jobs
Table of contents
Start job
Steps to start an elastic job
- On the left panel of the landing screen, right-click on the job under the ‘Jobs’ tree view.
- From the menu items, click the ‘Start job’ button.
Stop job
Steps to stop an elastic job
- On the left panel of the landing screen, right-click on the job under ‘Jobs’ tree view.
- From the menu items, click the ‘Stop job’ button.
Enable/Disable job
Steps to enable/disable an elastic job
- On the left panel of the landing screen, right-click on the job under ‘Jobs’ tree view.
- Click the ‘Enable’/’Disable’ button from the menu items.
Clone job as New
Steps to clone an elastic job
- On the left panel of the landing screen, right-click on the job under ‘Jobs’ tree view.
- Click the ‘Clone Job as New’ button from the menu items.
Script job (T-SQL)
Steps to script job definition of an elastic job in T-SQL
- On the left panel of the landing screen, right-click on the job under ‘Jobs’ tree view.
- Click the ‘Script Job (T-SQL)’ button from the menu items.
Enable or Disable button in the menu list will appear depending on the current activation status of the job.
View history
Feature update
The Job History Viewer screen provides detailed information about the execution history of specific jobs. Users can access this screen by clicking
- the “Job History” button on the landing page ribbon.
- on a job’s “View History” menu item.
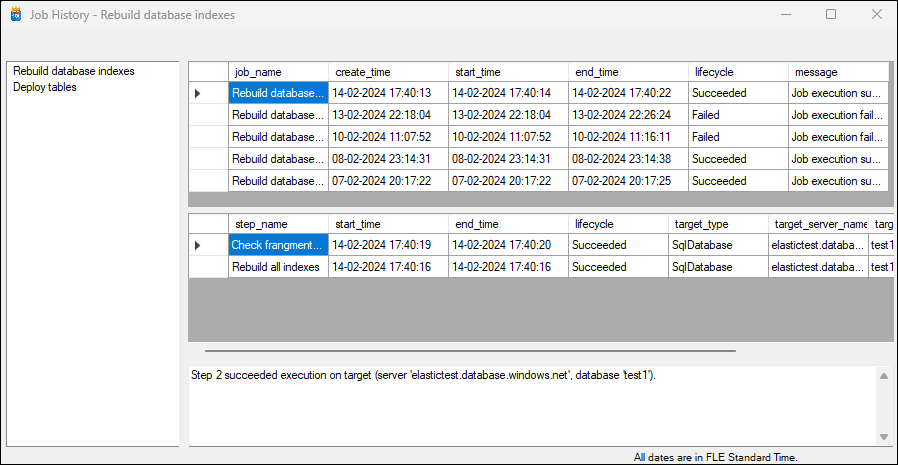
Features and Information Displayed:
- Job Status KPI Indicators:
- Displays the percentage of job statuses over the selected period.
- Job List:
- Displays a list of jobs with their names, creation times, start times, end times, lifecycle statuses, and messages.
- Users can select a job to view its specific steps and details.
- Step Details:
- Upon selecting a job, users are presented with the steps associated with that job.
- Information includes step name, start time, end time, lifecycle status, target type, and target server name.
- Execution Message:
- At the bottom of the screen is a message displaying the success or failure status of the step execution along with additional details.
- Filters:
- Filter the jobs from the right-side tree-view list. Double-click on any job to open it’s definition,
- Select the from and to dates for analyzing the history of job executions.
Navigation:
Users can navigate through different jobs and their steps to monitor and analyze their execution histories.