Installation and activation
Table of contents
- Order a license key
- Download the Installer
- Activate license key
- Choose an Installation Target
- Manual Installation from Visual Studio Marketplace
- Uninstall the software
Order a license key
Unlock the full power of Azure Elastic Jobs Manager by purchasing a license key. The licensed version removes trial limitations and enables full features of the tool.
Download the Installer
Login to your account and navigate to downloads page. Download the zip file. Alternatively, you will receive a link to download the software by email.
Activate license key
You will receive the license key via email. You can also find the license key at my-accounts.
- Launch Azure Elastic Jobs Manager Installer.exe.

- Enter the product key on the landing page screen and click on the ‘Activate Product’ button. It should activate the product on the machine.
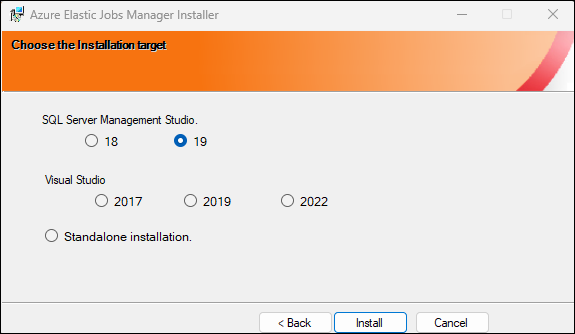
Choose an Installation Target
- Launch Azure Elastic Jobs Manager Installer.exe and click Next.
- Choose the installation target from SQL Server Management Studio (SSMS), Visual Studio or Standalone installation.
- Click Install
Manual Installation from Visual Studio Marketplace
Visual Studio 2017/2019
- Open Visual Studio 2017 or 2019.
- Click
Toolsmenu item and clickExtension and Updates. - Under
Onlinesection, search forAzure Elastic Jobs Managerand clickDownload.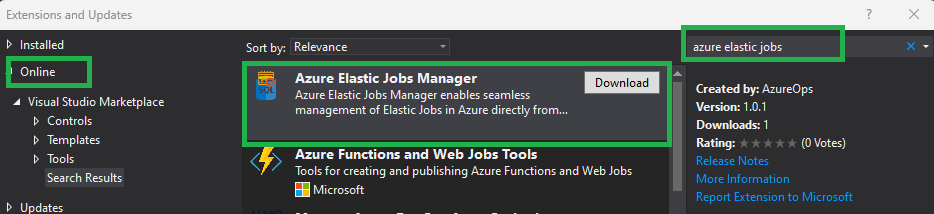
- Once the download is done, restart Visual Studio and complete the installation.
- Click on the Tools menu item. You will see the
Azure Elastic Jobs Manageroption. Click it to launch.
Visual Studio 2022/2026
- Open Visual Studio 2022 or 2026.
- Click
Extensionsmenu item and clickManage Extensions. - Under
Onlinesection, search forAzure Elastic Jobs Managerand clickDownload.
- Once the download is done, restart Visual Studio and complete the installation.
- Click on the Tools menu item. You will see the
Azure Elastic Jobs Manageroption. Click it to launch.
SQL Server Management Studio 18
Download Visual Studio 2017/2019 Extension
- Extract the file
Azure.Elastic.Jobs.Manager.Plugin.20172019.vsixcontent in a folder namedAzure Elastic Jobs Managerusing 7zip. - Copy this folder to the location
C:\Program Files (x86)\Microsoft SQL Server Management Studio 18\Common7\IDE\Extensions. You would need admin permissions to do this. - Restart SSMS 18.
- You will now see the “Azure Elastic Jobs Manager” option under the Tools menu item. Click it to Launch.
SQL Server Management Studio 19
Download Visual Studio 2017/2019 Extension
- Extract the file
Azure.Elastic.Jobs.Manager.Plugin.20172019.vsixcontent in a folder namedAzure Elastic Jobs Managerusing 7zip. - Copy this folder to the location
C:\Program Files (x86)\Microsoft SQL Server Management Studio 19\Common7\IDE\Extensions. You would need admin permissions to do this. - Restart SSMS 19.
- You will now see the “Azure Elastic Jobs Manager” option under the Tools menu item. Click it to Launch.
SQL Server Management Studio 20
Download Visual Studio 2017/2019 Extension
- Extract the file
Azure.Elastic.Jobs.Manager.Plugin.20172019.vsixcontent in a folder namedAzure Elastic Jobs Managerusing 7zip. - Copy this folder to the location
C:\Program Files (x86)\Microsoft SQL Server Management Studio 20\Common7\IDE\Extensions. You would need admin permissions to do this. - Restart SSMS 20.
- You will now see the “Azure Elastic Jobs Manager” option under the Tools menu item. Click it to Launch.
Standalone installation
- Extract the file
Azure.Elastic.Jobs.Manager.Plugin.20172019.vsixcontent in a folder namedAzure Elastic Jobs Managerusing 7zip. - Place this folder in your preferred location and double-click the
Azure.Elastic.Jobs.Manager.exefile, to launch the application.
Uninstall the software
SQL Server Management Studio 18
- Close all instances of SSMS 18.
- Navigate to the location
C:\Program Files (x86)\Microsoft SQL Server Management Studio 18\Common7\IDE\Extensions. And deleteAzure Elastic Jobs Managerfolder. You would need admin permissions to do this. - Start SSMS 18. You should not see Azure Elastic Jobs Manager button under the tools menu item anymore.
SQL Server Management Studio 19
- Close all instances of SSMS 19.
- Navigate to the location
C:\Program Files (x86)\Microsoft SQL Server Management Studio 19\Common7\IDE\Extensions. And deleteAzure Elastic Jobs Managerfolder. You would need admin permissions to do this. - Start SSMS 19. You should not see Azure Elastic Jobs Manager button under the tools menu item anymore.
SQL Server Management Studio 20
- Close all instances of SSMS 20.
- Navigate to the location
C:\Program Files (x86)\Microsoft SQL Server Management Studio 20\Common7\IDE\Extensions. And deleteAzure Elastic Jobs Managerfolder. You would need admin permissions to do this. - Start SSMS 20. You should not see Azure Elastic Jobs Manager button under the tools menu item anymore.
Visual Studio 2017/2019/2022
- Navigate to the
Toolsmenu item and click onExtensions and updates. - Locate
Azure Elastic Jobs Managerfrom installed plugins and click onUninstallbutton. - You would need to restart Visual Studio for changes to take effect.